Buy CF7 (Contact Form 7) Envato Market Item Support Request WordPress Plugin
© All rights reserved.Buy CF7 (Contact Form 7) Envato Market Item Support Request WordPress Plugin
© All rights reserved.Thank you for purchasing the Template. If you have any questions (after purchase or pre-purchase query) that are beyond the scope of this help file, please feel free to email us with mention Purchase Code ( Where Is My Purchase Code?) via my user page contact form here. You can also Ping Us (after purchase or pre-purchase query) through Item Support Tab (better and fast). Or get in touch through our Website Support Page ( Required Purchase Code ) Thanks so much!
WordPress CF7 (Contact Form 7) Envato Market Item Support Request Add-ons. CF7 (Contact Form 7) Envato Market Item Support Request Form using Purchase Code Verification. Using this CF7 Add-ons plugin Envato Market customer can request Item Support using Envato Market Purchase Code verification process. This Add-ons plugin has made only for Envato Market Authors.
After extract the main zip file, you'll see these folders and files:
Each WordPress plugin can be installed in two ways: via ftp client or through the admin panel:
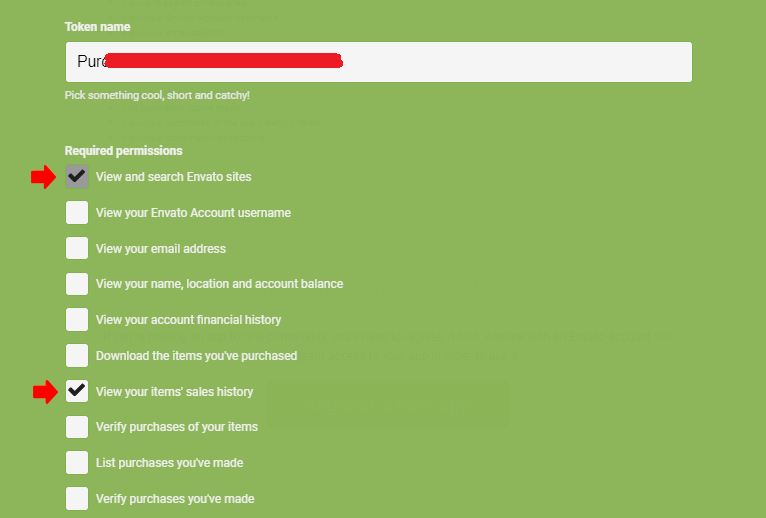
You can generate Envato API personal token here
When You will generate Envato API personal token, you will need the following permissions:
[Do not change totalsteps value]:Step 1 [Paste at the very begining of step 1]
Step 2 [Paste at the very begining of step 2]
Send/Submit button shortcode place within p tag and use class="clearfix"
<p class="clearfix">[submit class:button-primary "Send Request"]</p>
At the end of the form mean after Send/Submit button shortcode You have to add the following Shortcode
For Single Step Form totalsteps='1'
At Step1 the following shortcode (purchase code verification field shortcode) is required. Do not forget to put the following shortcode
If you like to show Purchase Info (especially only for purchase code verification) you have to set mgsshowpurchaseinfo='1'
So, to show Purchase Info the final shortcode will be:
At the end of the form mean after Send/Submit button You have to add the following Shortcode
Only for the Ppurchase Code verification Form Add the following css in your theme style css:
.mgscf7envatopurchasecodesection h3.mgscf7envatopurchasecodesection-title {
    display: none;
}
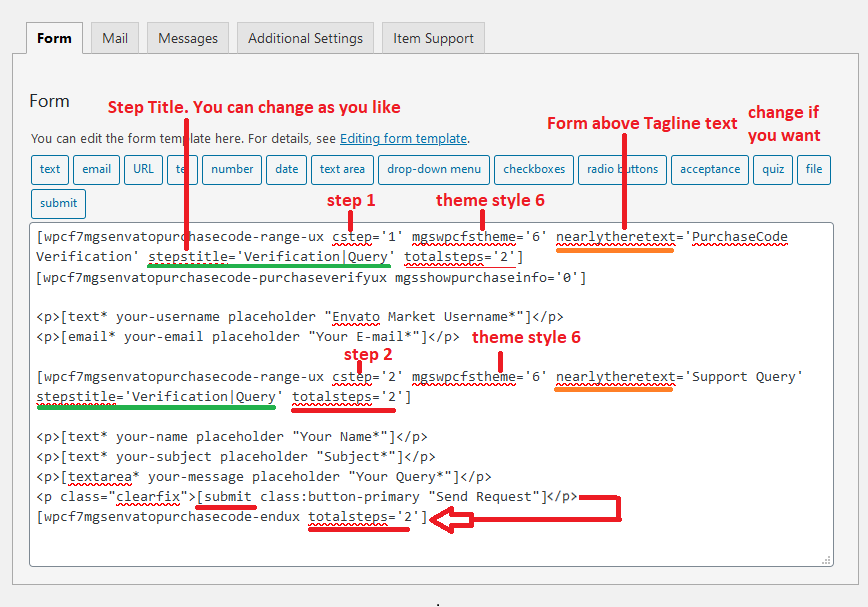
You have to Add the Steps Title with the following code in each step Shortcode
Change Steps Title (Step1|Step2) according to your choice
stepstitle='Step1|Step2'

You have to Add the Button Text with the following code in each step Shortcode
You Do not need to add the following button text if you want to go with the following default button text
nearlytheretext='PurchaseCode Verification'
areyoureadytext='Are You ready!'
nextbtntext='Next'
backbtntext='Back'
Send/Submit button shortcode place within p tag and use class="clearfix"
<p class="clearfix">[submit class:button-primary "Send Request"]</p>

Translation Redy:language fileincluded. So, if you can change any text into your local language using any WordPress Multilingual Plugin as likeWPML/Loco Translate/qTranslateor any other you like.
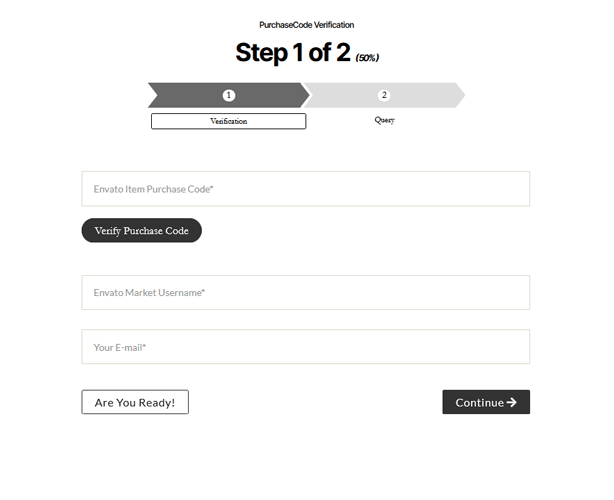
(1). How to change Form Tag (in just above screenshots: PurchaseCode Verification) Text
You have to Add the following code only in the cstep='1' Shortcode
nearlytheretext='PurchaseCode Verification'
Example:
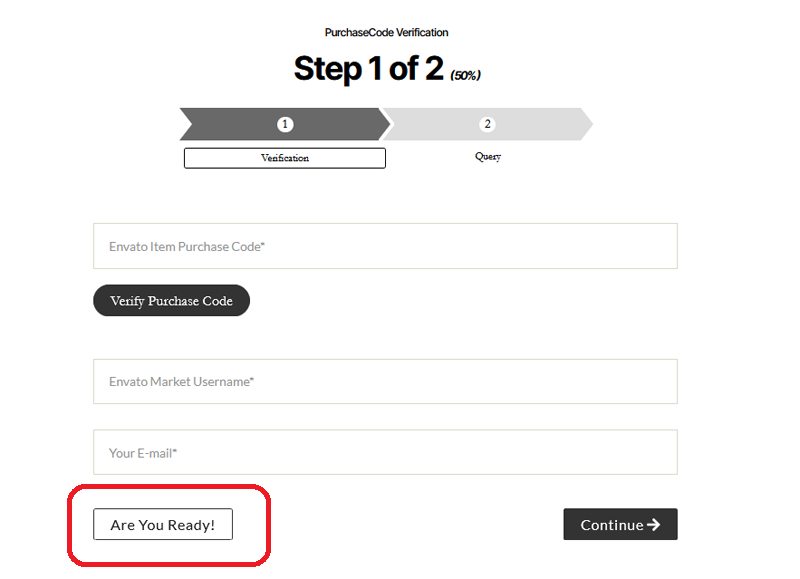
(2). How to change Are You ready! (in just above screenshots: Are You ready!) Text
You have to Add the following code only in the cstep='2' Shortcode
areyoureadytext='Are You ready!'
Example:
(3). How to change Next Button (in just above screenshots: Next Button) Text
You have to Add the following code in the cstep='2' Shortcode
nextbtntext='Next'
Example:
(4). How to change Back Button (in just above screenshots: Back Button) Text
You have to Add the following code in the Shortcode
backbtntext='Back'
Example:
You have to Add After the Form Send/Submit button Shortcode
We have currently few themes.
Theme 1 default theme and you do not need to do anything for this theme.

Theme 2 - for choosing this theme you have to set:

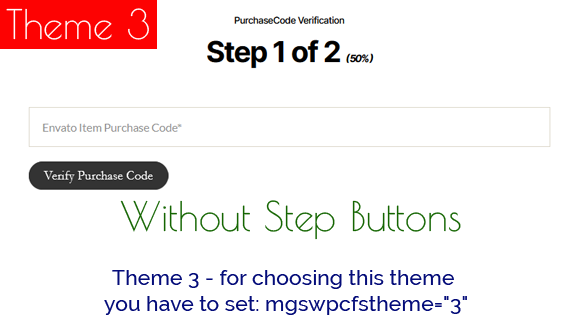
Theme 3 - for choosing this theme you have to set:
You can choose this Theme 3 if the steps are many more
Theme 4 - for choosing this theme you have to set:

Theme 5 - for choosing this theme you have to set:

Theme 6 - for choosing this theme you have to set:

Theme 7 - for choosing this theme you have to set:

You have to Setup Theme by adding the following code in each step Shortcode (if you like to change theme).
Example:
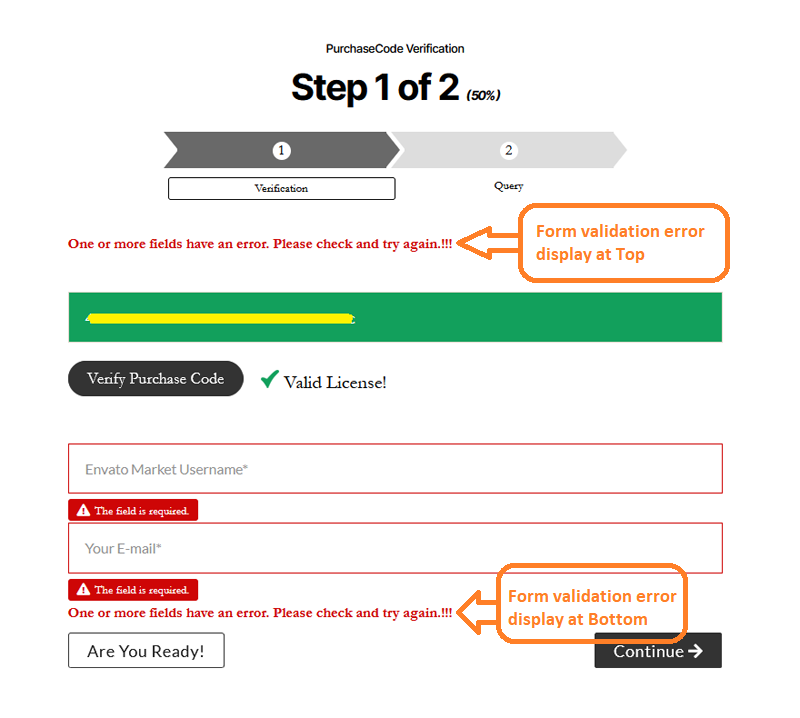
Add the following css in your theme style css to hide Form Top error
.help-block.with-errors.mandatory-error.displerrortop {
   display: none;
}
Add the following css in your theme style css to hide Form Bottom error
.help-block.with-errors.mandatory-error.displerrorbot {
   display: none;
}
Customize the following css to change the Form Button (Next/Back) Style and add in your theme style css to make effect
.wpcf7-form .mgscf7envatopurchasecode-btn-group .btn {
	font-size:18px;
	padding: 6px 25px;
	border-radius: 3px;
}
.wpcf7-form .mgscf7envatopurchasecode-btn-group .mgswpcf7btn-custom {
	background-color: rgba(3, 8, 223, 0.9);
	border: 1px solid rgba(3, 8, 223, 0.9);
	color: #fff;
}
.wpcf7-form .mgscf7envatopurchasecode-btn-group .mgswpcf7btn-custom::before {
	background-color: #fff;
}
.wpcf7-form .mgscf7envatopurchasecode-btn-group .mgswpcf7btn-custom:hover, .wpcf7-form .mgscf7envatopurchasecode-btn-group .mgswpcf7btn-custom:focus, .wpcf7-form .mgscf7envatopurchasecode-btn-group .mgswpcf7btn-custom:active {
	border-color: #0505f5;
	color: #000;
}

[You can add in your theme style css]
.wpcf7-form .mgscf7envatopurchasecodesection h3.mgscf7envatopurchasecodesection-title {
    display: none;
}

[You can add in your theme style css]
Add the following css in your theme style css to hide the above Percentage
.wpcf7-form .mgscf7envatopurchasecodesection h3.mgscf7envatopurchasecodesection-title em {
    display: none;
}
[You can add in your theme style css]
Add the following css in your theme style css to hide the above Ready to Start! Button
.wpcf7-form .mgscf7envatopurchasecode-btn-group.mgscf7envatopurchasecode-btn-box-1 .btn.mgswpcf7btn-default.disable {
    display: none;
}
Purchase Code mail tag
Support Request Ticket No
Purchased Info
If you want to use html email template do not forget to Use HTML content type
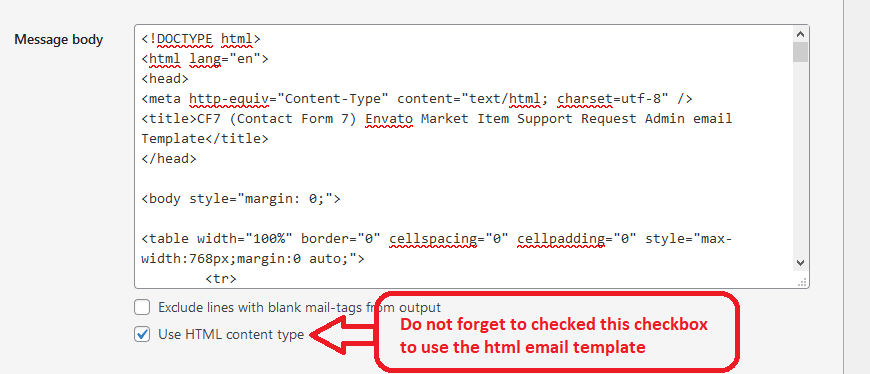
Admin html email Template File has included in documentation folder.
Autoresponder (Customer) html email Template File has included in documentation folder.
Just Copy any of the following example code and paste into your Contact Form 7 form code area. You can add/edit/delete form field in step 2 but in step 1 please do not edit/delete code.
You can use any of the following Contact Form 7 example code
in your Contact Form 7 form code to set the Envato Market Item Support Request form.
And Done!Enjoy! the CF7 (Contact Form 7) Envato Market Item Support Request form
For Default Step Title Text (Step1|Step2)
[wpcf7mgsenvatopurchasecode-range-ux cstep='1' totalsteps='2']
[wpcf7mgsenvatopurchasecode-purchaseverifyux mgsshowpurchaseinfo='0']
[text* your-username placeholder akismet:username "Envato Market Username*"]
[email* your-email placeholder akismet:author_email "Your E-mail*"]
[wpcf7mgsenvatopurchasecode-range-ux cstep='2' totalsteps='2']
[text* your-name placeholder akismet:author "Your Name*"]
[text* your-subject placeholder akismet:author_subject "Subject*"]
[textarea* your-message placeholder "Your Query*"]
<p class="clearfix">[submit class:button-primary "Send Request"]</p>
[wpcf7mgsenvatopurchasecode-endux totalsteps='2']
For Single Step Form totalsteps='1'
With customize Step Title and Button Text
You can change step title (Step1|Step2) and button text as you need
[wpcf7mgsenvatopurchasecode-range-ux cstep='1' nearlytheretext='PurchaseCode Verification' stepstitle='Verification|Query' totalsteps='2']
[wpcf7mgsenvatopurchasecode-purchaseverifyux mgsshowpurchaseinfo='0']
[text* your-username placeholder akismet:username "Envato Market Username*"]
[email* your-email placeholder akismet:author_email "Your E-mail*"]
[wpcf7mgsenvatopurchasecode-range-ux cstep='2' nearlytheretext='Support Query' areyoureadytext='Are You OK!' stepstitle='Verification|Query' nextbtntext='Continue' totalsteps='2']
[text* your-name placeholder akismet:author "Your Name*"]
[text* your-subject placeholder akismet:author_subject "Subject*"]
[textarea* your-message placeholder "Your Query*"]
<p class="clearfix">[submit class:button-primary "Send Request"]</p>
[wpcf7mgsenvatopurchasecode-endux totalsteps='2']
With Theme style and customize Step Title and Button Text
We have currently few themes.
Theme 1 default theme and you do not need to do anything for this theme.
Theme 2 - for choosing this theme you have to set:
Theme 3 - for choosing this theme you have to set:
You can choose this Theme 3 if the steps are many more
Theme 4 - for choosing this theme you have to set:
Theme 5 - for choosing this theme you have to set:
Theme 6 - for choosing this theme you have to set:
Theme 7 - for choosing this theme you have to set:
[wpcf7mgsenvatopurchasecode-range-ux cstep='1' mgswpcfstheme='6' nearlytheretext='PurchaseCode Verification' stepstitle='Verification|Query' totalsteps='2']
[wpcf7mgsenvatopurchasecode-purchaseverifyux mgsshowpurchaseinfo='0']
[text* your-username placeholder akismet:username "Envato Market Username*"]
[email* your-email placeholder akismet:author_email "Your E-mail*"]
[wpcf7mgsenvatopurchasecode-range-ux cstep='2' mgswpcfstheme='6' nearlytheretext='Support Query' areyoureadytext='Are You OK!' stepstitle='Verification|Query' nextbtntext='Continue' totalsteps='2']
[text* your-name placeholder akismet:author "Your Name*"]
[text* your-subject placeholder akismet:author_subject "Subject*"]
[textarea* your-message placeholder "Your Query*"]
<p class="clearfix">[submit class:button-primary "Send Request"]</p>
[wpcf7mgsenvatopurchasecode-endux totalsteps='2']
[wpcf7mgsenvatopurchasecode-range-ux cstep='1' mgswpcfstheme='3' nearlytheretext='PurchaseCode Verification' totalsteps='1']
[wpcf7mgsenvatopurchasecode-purchaseverifyux mgsshowpurchaseinfo='1']

[wpcf7mgsenvatopurchasecode-endux totalsteps='1']
Only for the Ppurchase Code verification Form Add the following css in your theme style css:
.mgscf7envatopurchasecodesection h3.mgscf7envatopurchasecodesection-title {
    display: none;
}
Please click here it will take you codecanyon Item page you will see Live Preview Button.
Otherwise check live preview directly to my server Live Demo.

Or get in touch through our Website Support Page ( Required Purchase Code )